Last weekend we had planned to camp at the hilltop lake and meadow known as Paye (the second and more impressive part of the Siri Paaye area). Located in the Kaghan Valley, Siri Pae lies above the hilltop resort of Shogran and under the shadow of Makra Peak (about 3,600 meters/12,000 feet above sea level).

My biggest motivation for this trip was being able to shoot the Milky Way which isn’t normally possible from urban areas. Here are some things I did to get my shots:
Visibility
One of the main requirements for Milky Way photography is being far away from artificial lighting of any kind. City lights, as well as light from small towns and villages, cause all but the brightest stars to be invisible, both to the naked eye, as well as to the camera sensor. Air pollution also reduces visibility so being up on a mountain, in the middle of nowhere, is almost a must. This is the reason observatories are built in such places.
Weather reports had said there would be clear skies. However, I had neglected to check where the moon would be. Though not a full moon, it was enough to ruin my plans. Moonlight is good for general night photography, but makes milky way photography almost impossible due to it “drowning out” the light from other heavenly bodies. Luckily, I had installed the Solar and Moon Calculator Android app some time back and it told me the exact time the moon would eventually set (somewhere past midnight).
Timing
After trying out a few moonlit shots once the sun had set, I took a nap and woke up again around 2am. It was pretty cold at this altitude, my friends were all asleep and there were strange howling sounds coming up from the valley next to our tents, but the view really was impressive, even to the naked eye. I had never seen the Milky Way this clear before. The campfire had gone out, but I was glad it did. Else, any stray light from it could have ruined my shots. In some cases, the reflected campfire light off of trees and other structures could add an interesting effect, but I didn’t want to risk it here.

It really was good timing since within a couple of hours, a light cloud cover started to roll in and blot out the milky way. The clouds also dashed my chances of getting some long exposure, star trail photos.
Focal Length
So I got my gear ready, dialed in the basic settings that I had memorized and took a shot. Amazingly, they came up really good on the first try. There are some basic rules to follow when shooting the Milky Way. The most important one is to use the 600/focal length, or 500/focal length, rule to prevent stars turning into trails or ovals (I shot at 16mm, so 500/16 allowed me about 30 seconds of exposure). If you have good equipment, you can also try 450/focal length to get even better results.
Gear
A limited exposure time also means that you’ll need to have a wide aperture and shoot at a high ISO to get a good exposure. This is where my investment in the Canon EF 16-35mm f/2.8 II USM lens and the Canon EOS 5D Mark III paid off. The 16-35mm is just 1mm wider than the much cheaper 17-40mm and they are both excellent lenses. However, the f/2.8 aperture really came in handy as opposed to the 17-40mm’s f/4. And the 5D Mark III’s ultra low noise at high ISOs made it perfect for the job.
Unless you have a lens with an aspherical element (like the 16-35mm) you may experience coma or comatic aberration in the stars. That’s another thing to consider when selecting a lens for this.
Off course, a tripod is a must since you’re shooting with several seconds of exposure. I have a cheap ball head tripod from some Asian company that can’t really replace a branded one such as Manfrotto, Gitzo or Benro. However, it is really stable and surprisingly light. Weight is important since as in my case, you may have to drag it up a few thousand feet along with the rest of your gear.
Other things I did included stabilizing the tripod by attaching some weight to the hook at the end, using a remote release (intervalometer) and covering up the eyepiece with the provided rubber. This last step ensures that no stray light from your torch entering the viewfinder ruins the shot.

Settings
I took several shots, some at f/2.8, others stopped down to f/3.5 just to see the difference, though there wasn’t much in the final shots and I suggest just shooting at f/2.8 (or whatever maximum you can achieve). I also had Long Exposure Noise Reduction (LENR) turned on to reduce noise buildup.
I keep the white balance set to “Cloudy” for most shots, though star light is usually around the same temperature as the sun so it was later changed to “Sunny”. A custom white balance can be a pain (especially for Canon users), though if your camera supports shooting in RAW format, the white balance and other parameters can be fine-tuned later on.
Focusing
First of all, auto focus is pretty much useless here. Unless you and your camera can find a really bright star or another high contrast object that is visible in the tiny viewfinder, the camera will keep trying to auto focus without success. So manual focus is a must here.
Ever since I discovered live view focusing, my shots have been a lot better focused and sharper. For astrophotography however, it may be too dark to see much on the screen. You can either focus using the focus scale set to around “infinity” or try to locate a bright star on the LCD, zoom in and turn the focus ring until you get a clear, sharp dot.
Failing that, the only option left is the tedious trial and error method. That is, take a shot, slightly change focus, take another shot and compare it to the last one. Repeat until you have sharp exposure.
Though it couldn’t be used for focusing, the viewfinder was very useful for composing the shot. So best thing to do would be to use live view to focus and then look through the eyepiece to compose and frame the shot.
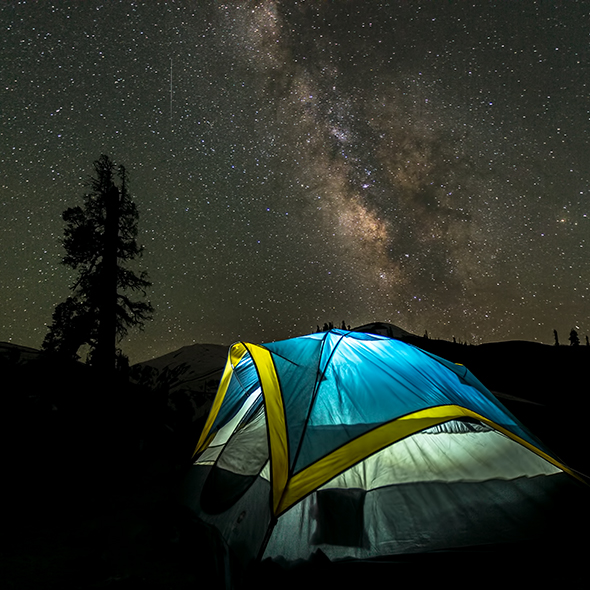
Foreground Objects
Shooting the Milky Way alone doesn’t seem very exciting. Adding an object in the foreground gives it some depth and perspective. This is why I included a silhouette of a tree in most shots. Light painting the foreground objects is also a nice way to bring out the shots. Unfortunately, I only had a small LED flashlight which wasn’t very powerful and gave a much whiter effect, compared to the Milky Way’s warmer tone.
Post Production
I’m not much for very fancy post-production or “Photoshopping”. However, you will need to adjust the white balance, exposure and contrast a little to bring out the details. You may also need to use a noise reduction software/plugin, depending on how good your camera handles high ISO noise.
Going Forward
I can’t wait to get another shot at this and try to improve on what I achieved from this trip. There isn’t much I would change, but I would be better prepared for any light painting. Maybe with a more powerful flash lights with varying degrees of temperature. Would also light to get some good star trail pics. Till next time.